
Andrey Petrov <apetrov@fnal.gov>
Project home page: https://synoptic.fnal.gov
Last version of this document: https://synoptic.fnal.gov/doc/guide/index.html
PDF Version: https://synoptic.fnal.gov/doc/guide/synoptic-1_3.pdf
© 2010–2012 Fermi Research Alliance, LLC.
Synoptic is a system for graphical representation of real-time data in the Fermilab Accelerator Control System, superseding the legacy ACNET Lex SA application. The Synoptic's functions are similar to those of EPICS EDM, DESY JDDD, and, to some extend, LabVIEW. In a few words, the system offers a way for domain experts to create, in a short time, coherent diagrams representing a machine or a process, along with actual readings from the control system indicating its current state. It also optionally supports setting data back to the control system. The development process does not require the users to be familiar with programming, as the displays are composed in a high-level graphical editor from preexisting building blocks: gauges, alarm indicators, static shapes, and such. Similarly, the runtime environment takes care of all internal “plumbing and wiring” between components and hides the complexity of the actual data acquisition protocols.
The core idea of Synoptic is not new. As a matter of fact, each major control system in the world of high-energy physics has its own, custom implementation of that concept. Recognizing this, the latest version of Synoptic was designed to provide better and rather tight integration with other parts of the Fermilab Accelerator Control System, and it is not readily portable.
Let's start with a few practical cases of running Synoptic displays from the central repository. A step-by-step instruction on how to create a custom display will follow. As it was said, the reason for multiple running procedures is to make the displays available under as many environments as possible. Detailed requirements for every mode are given in §§ 2.2, 3.2, 4.2.
To try out Synoptic, you may use the following displays:
| /Demo/Gauges | Examples of various visual components showing simulated data. |
| /Cryo/Meson/MESON_CRYO/Adsorbers | Reading actual data from the control system. |
| /Demo/Controls | Reading and setting a real test device (Z:CACHE) in the control system. |
Other displays in the central repository should work too, unless they are
in the /Legacy or in the /Work_in_progress directories.
Web Viewer renders Synoptic displays in conventional web browsers. The use of Scalable Vector Graphics (SVG) with incremental updates eliminates flickering of the image and requires very little bandwidth. All latest versions of Firefox, Safari, and Chrome will work with no additional configuration (client-side JavaScript must be enabled). The Internet Explorer requires Adobe SVG plug-in. This mode requires no user authentication. Setting data to the control system is not supported by design.
To run a display in Web Viewer:
For more information, see § 2 Using Web Viewer.
The Viewer application is a Java program that can run on a local computer. It acquires readings directly from the control system, and is capable of setting data back. The data connection requires a valid MIT Kerberos ticket, and it will works only within the Fermilab network. Authorized users may set data. If the opened display does not use real-time data, the application is not subject to the above restrictions and may work autonomously.
To run a display in the Viewer Application:
For more information, see § 3 Using The Viewer Application.
The Viewer application can be used directly from the ACNET Console environment. In this case, the program runs on a central node, while its frames are displayed by the local X server. The system requirements for this mode are similar to those of the ACNET environment. As a rule of thumb, if you can launch ACNET Console, you should be able to run a fully-functional version of Synoptic with settings, as well. No special configuration is necessary either locally or remotely.
To launch a display from ACNET:
Note: In the lightweight ACNET Java Console, D99 will start the local Viewer application, as described in § 1.2.2, subject to all system requirements and security restrictions.
For more information, see § 3 Using The Viewer Application.
The Builder application is used to edit Synoptic displays. It is a Java program, which should in most cases run locally. Technically, Builder does not connect to the control system, thus it does not require the Kerberos ticket and the right connectivity. It is possible, however, to launch the Viewer application directly from Builder, in which case all the requirements from § 1.2.2 will be in effect.
To launch the Builder application:
After the application starts up, it will open a new empty project. To create a simple working display using simulated data (thus, not requiring connection to the control system), do the following:
For more information, see § 4 Using The Builder Application.
The diagram below shows the overall organization of Synoptic.
The system comprises 5 main components:
Note that Web Engine can only launch displays stored in the central repository, whereas the Viewer and the Builder applications are able to work with both the repository and regular files.
The open-source Java Synoptic Toolkit is distributed under a BSD-style license. It includes a core of Synoptic, free of dependencies from the proprietary infrastructure, and can be used with any data acquisition system, providing that an appropriate data access interface is developed. The product can be customized in a variety of ways, for instance, by developing specialized components for rendering data.
The Toolkit consists of the following:
More information on Synoptic, including emergency procedures, technical notes, and the most recent updates not covered by this guide can be found at the project's wiki at https://www-bd.fnal.gov/issues/wiki/Synoptic (not available outside Fermilab). To report bugs or make suggestions, write to synoptic-support@fnal.gov.
Web Viewer takes advantage of built-in capabilities of many modern web browsers to display SVG images. A custom JavaScript embedded in the web page allows for smooth updates of the display image without reloading the entire document. The main disadvantage of Web Viewer is that the updates are synchronous: the server has no means to notify the client about new data. The client has to poll the server once every few seconds.
Web Viewer does not allow setting data to the control system, does not require user authentication, and does not impose strict security policies. Most displays can be opened from any location, including those outside Fermilab.
All displays from the central repository can be opened from a catalog at https://synoptic.fnal.gov by clicking the display's name.
Each display is associated with a unique URL, which can be treated as a regular
web page address: saved in the browser bookmarks, put on the computer's desktop
as a shortcut, and so on. The display URL consists of a static prefix,
https://www-bd.fnal.gov/synoptic/display , followed by the display
name (begins with a slash, with no file extension), optionally followed by a
comma-separated list of parameters in parentheses.
For example, these are valid display URLs:
In order to render live Synoptic displays properly, a browser must support Scalable Vector Graphics (SVG) and JavaScript. The following table shows which browsers on which operating system can do this:
| Internet Explorer | Firefox | Chrome | Safari | Opera | Android Browser | |
|---|---|---|---|---|---|---|
| Windows | Requires SVG plugin | Yes | Yes | Yes (presumably) | ||
| Mac | Yes | Yes | Yes | Yes | ||
| Linux | Yes | |||||
| iPhone & iPad | Yes | No | ||||
| Android | Yes | Yes | No |
(Assumed reasonably up-to-date versions of software)
The Viewer is a standalone Java application that executes Synoptic displays. It imposes user authentication and supports setting data to the control system. Displays' definitions can be loaded either from the central repository or from plain files. Generally, all production displays are stored in the repository, whereas the files are used mainly during the development phase.
The Viewer application can run in two modes: locally and on a central node. The latter also includes launching the program off ACNET Console. Both ways offer equal functionality, but there is no single answer as to which mode is to be preferred. Some configuration to the Java environment, firewall, and network connection may be required in order to use Viewer locally, but it will probably run a little faster and will be better integrated with other software on the same machine, local printers, and the file system. Conversely, all central nodes are properly configured and maintained, but it takes some time to log in there, and the application may be less responsive.
The following start-up methods can be used:
synoptic-viewer command optionally followed by the name
of a display.
In all cases, Viewer is being launched by passing a special URL to the Java Web Start utility. That URL can be customized to open a particular default display. It can also be saved as a shortcut on the computer's desktop, placed in a web document, or assigned to an ACNET page.
The URL to open empty Viewer is:
A URL that opens a display from the central repository looks like:
In this example, a display called /Demo/Gauges will be loaded.
Note that the display name begins with a forward slash and does not include
a file extension. In some cases, the ampersand character inside the URL need
to be escaped. For example, in a shall script the entire string has to be
enclosed in single quotation marks.
A host running the Viewer application should satisfy the following requirements:
The requirements marked (†) are normally met by all centrally administered desktops and laptops at the Accelerator Division. When Viewer is launched on a central node, the local computer should be able to connect to that node, but does not have to satisfy the above requirements.
The Viewer's graphical user interface is mostly intuitive. A few words should be said about different ways of opening displays:
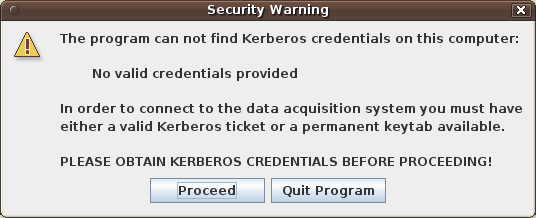
The Viewer application will decide by itself when to connect to the control system. The connection is established only if the display requests actual data. Displays including only simulated data sources can work autonomously. The users must posses a valid MIT Kerberos ticket before the connection attempt is made. If the program can not find a ticket, it shows the following warning:
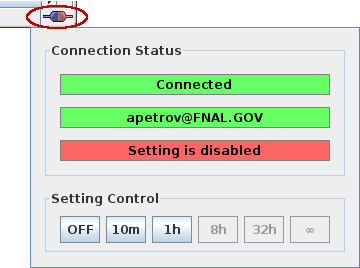
Within the program, the data connection is controlled by an icon in the bottom-right corner of its frame. To open a dialog, simply click that button:
The Viewer application chooses a right data broker automatically. There is no need to connect or disconnect manually.
After the Viewer application starts up, setting is normally disabled. According to the application security policy, an ordinary user must always unlock setting explicitly and for a limited time.
The display widgets capable of setting data to the control system include input fields, buttons, and sliders. When setting is disabled, a gray cross is shown in front of all setting components connected to real devices. If there is a setting component on the display that is not connected to the control system, the cross does not appear even if setting is disabled.
To unlock setting, open the connection dialog as described above and press one of the button:
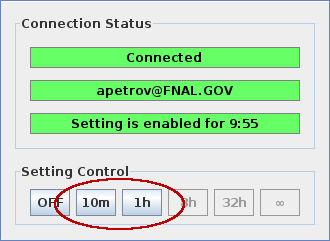
Whether and for how long setting may be unlocked is decided by the data broker. After a button is pressed, the program should respond immediately. If it is permitted to enable setting, the third line will turn green, saying “Settings enabled for ...”, and all the gray crosses will disappear.
The Builder is a standalone Java application that can edit Synoptic displays and save them in the central repository and in local files. It is possible to launch the Viewer application directly from Builder to verify the display under development.
The Builder application can run in two modes: locally and on a central node. This is similar to Viewer, and the trade-offs are, as well, custom configuration vs. speed and usability. In practice, most users should to run Builder in the local mode.
The following start-up method can be used:
synoptic-builder
command optionally followed by the name of a display.
The URL that opens empty Builder is:
A host running the Builder application should satisfy the following requirements:
/Work_in_progress are editable by
everybody.
The requirements marked (†) are normally met by all centrally administered desktops and laptops at the Accelerator Division. When Builder is launched on a central node, the local computer should be able to connect to that node, but doesn't have to satisfy the above requirements.
In order to run Viewer from the Builder application, the requirements specified in § 3.2 must also be met.
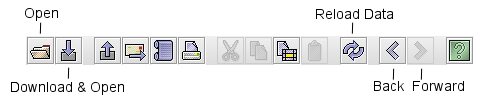
Below is a snapshot of the Builder's window, as it looks after the start-up:
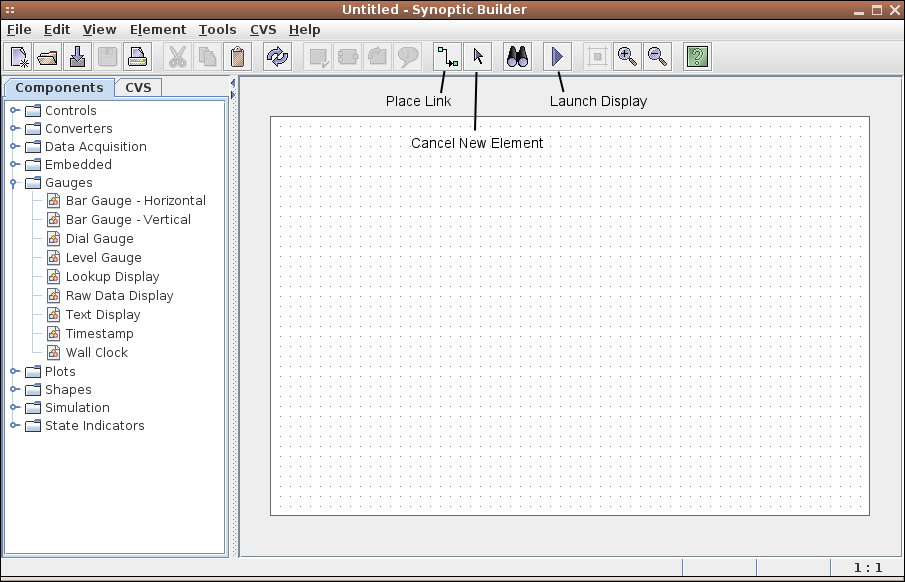
There most important control elements are:
Each display consists of a list of components. There are four classes of them: active components, static shapes, data links, and displays themselves.
Each component has a list of properties. To call up the property dialog, double-click the component or select Properties from the context menu. A set of permitted operation (rotation, adjustment of inputs and outputs, setting a background image) depends on the component's class.
When a component is placed onto a display, the component definition is actually copied into the display definition. After that, any modifications to the original components located under the Components tab will not affect the component instances already used by displays.
 Active components can accept and produce data. Every active component has
an associated program code that defines its look and behavior in the runtime.
Data acquisition components and data converters are hidden in the runtime.
Most others are visible. In Builder, all active components are represented
as rectangular shapes that normally (but not always) define the bounds in
which the runtime version would fit.
Active components can accept and produce data. Every active component has
an associated program code that defines its look and behavior in the runtime.
Data acquisition components and data converters are hidden in the runtime.
Most others are visible. In Builder, all active components are represented
as rectangular shapes that normally (but not always) define the bounds in
which the runtime version would fit.
Most of the active component support background images. To set up a background, select Background Image → Load From File in the context menu. Supported formats are PNG, GIF, and JPEG.
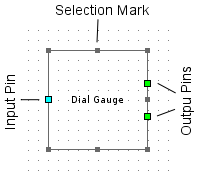
Active components have input and output pins. To change the number of pins, use I/O Config... from the context menu.
Active components can not be rotated.
A complete reference on all available active components can be found at https://www-bd.fnal.gov/issues/wiki/SynopticComponentReference (not available off-site).
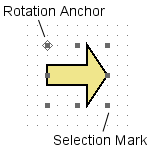 Static shapes are plain vector images. They have nothing to do with data,
thus do not have inputs or outputs. In Builder, shapes can be moved, resized,
and rotated.
Static shapes are plain vector images. They have nothing to do with data,
thus do not have inputs or outputs. In Builder, shapes can be moved, resized,
and rotated.
Static shapes look identically in Builder and in Viewer.
Data links are virtual ”pipes“ used to pass data between active components. Each link connects exactly one output with one input. Links are hidden in the runtime. No circular links are permitted.
In order to connect two components, click the Place Link button from the main menu, or simply press C. Move the mouse over an output (green) pin on the first component and click the left button. Place intermediate points, if needed. Move the mouse over an input (cyan) pin on the second component and click the left button. The link is done.
Each display itself is an active component. The only difference is that it may not have inputs or outputs. To place one display into another, use Embedded → Embedded Display on the Components tab.
The Builder application has the following options for loading and saving display definitions:
There is no option for saving displays directly to the central repository. This should to be done using the CVS workflow, as described in § 4.6. When a display is opened using Download & Open..., the loaded display definition is neither associated with a local file, nor can it be saved back into the repository. As such, this function should be used with caution, only as a quick way to inspect the contents of the repository.
All displays intended for production use should be stored in the central
CVS repository. Builder includes a simple embedded CVS client, which supports
three main operations: status, update, and commit.
For more complex functions, use generic tools, such as cvs
command on Unix and Linux, or jCVS GUI application.
CVS requires the users to follow proper procedures. Most importantly, before editing a file its local copy should be synchronized with that on the server. Refer to CVS Manual for more information.
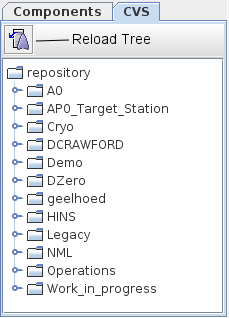
To start working with the repository, click the Reload Tree button on the CVS tab:
If the local working directory does not exist, the program will ask where
to create one. The default location is <user-home>/synoptic.
You may specify a different path right away, or change it later via
File → Preferences.... After the working directory
is configured, the CVS client loads a snapshot of the repository and shows
it as a file tree. Normally, this operation completes in a
few seconds. The actual files are not downloaded at that time, only their
meta information (an empty directory structure is created, though).
Various icons and text colors describe status of each file:

|
Unknown | The file exists locally, but its status in the repository is unknown. Reload the tree or select Refresh Status. |

|
Up-To-Date | A local version of the file matches its version in the repository. |

|
Locally New | The file exists only locally. Select Commit (Check In)... to upload it to the repository. |

|
Locally Updated | A local version of the file is newer than its version in the repository. Select Commit (Check In)... to upload the newer version to the repository. |

|
Remotely New | The file exists only in the repository. Select Update (Check Out) to download it into the working directory. |

|
Remotely Updated | A local version of the file is older than its version in the repository. Select Update (Check Out) to download the newer version into the working directory. |

|
Conflict | Both a local and a remote version of the file have changed. |
To refresh status, commit, and update files use the context menu. These operations work on both files and directories. To open a display, double-click its name in the tree or select Open in the context menu. Before committing a file, the system will ask to enter a note describing the changes that have been made.
It is hard and tricky to resolve conflicts on CVS. Try to avoid them by making sure that the file you are going to change is in sync with the repository and it is not changed simultaneously by somebody else. If you detect a conflict, do the following:
CVS/Enties file and remove a line containing the
name of the conflicting file.
The Synoptic project was started back in 2001 by Tim Bolshakov and Andrey Petrov of Accelerator Controls Department at Fermilab. The initial idea came from the ACNET Lex SA application by Brian Hendricks. Tim designed the Synoptic runtime. Andrey implemented the Builder application. Both contributed to the component library. In 2002, after Tim has invented a new mechanism of partial XML updates, the project got its current shape. Many updates and improvements to Synoptic were inspired by Brian DeGraff of Cryogenics.
Since Tim's departure from Fermilab in early 2008, Synoptic is maintained by Andrey. By December 2008 the system has been completely refactored, according to the new vision on its use in Fermilab Accelerator Control System.